Download a PDF version of this article.
Within Section 6 - External Walls of our Technical Manual the detail below can be found showing a horizontal roof abutment.
One of the critical details here is the correct linking of the cavity tray with the cover flashing, in that the cover flashing must sit directly underneath the cavity tray.
It is the incorrect installation of the horizontal cavity trays that is all too common on building sites.
In order to achieve this correct linking the cavity tray must be bedded on a thin bed of mortar, which is then raked out prior to the mortar curing, this is all in order to allow the cover flashing to be installed correctly underneath the cavity tray.
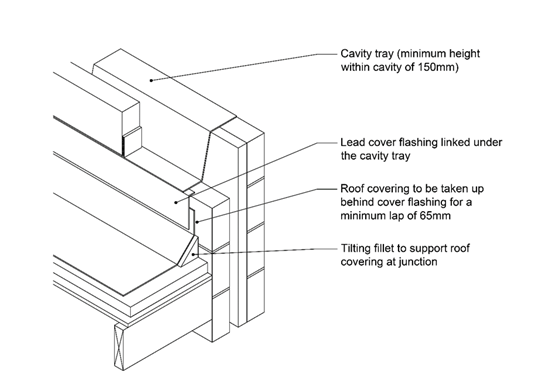
Figure 1: Cavity tray over a flat roof/wall abutment
This raking out of the thin mortar bed will allow the horizontal cavity trays to be visible over any such roof abutments whilst walking around a site. Therefore, if no cavity trays can be witnessed over a completed roof abutment, then the construction practices on a site need to be discussed with the site management.
Read more articles on the Resource Hub and sign up to receive our blog round-up.
Every care was taken to ensure the information in this article was correct at the time of publication (March 2022). Guidance provided does not replace the reader’s professional judgement and any construction project should comply with the relevant Building Regulations or applicable technical standards. For the most up to date Premier Guarantee technical guidance please refer to your Risk Management Surveyor and the latest version of the Premier Guarantee Technical Manual.
Ref: TS3138